
- Home
- Deceptions
- Solar
- Thermal Audit
- Ventilation
- Sensors
- Governance
- Environment
- Reference
- Contact
- News
RS-485 Interfacing Examples
EKM smart kWh meters
This is a guide on how to use a RS-485 to Ethernet adapter to interface intelligent devices like a EKM kWh meter to the internet. The device server being used is a gridconnect NET485 which incorporates the XPort-03 module from Lantronix.

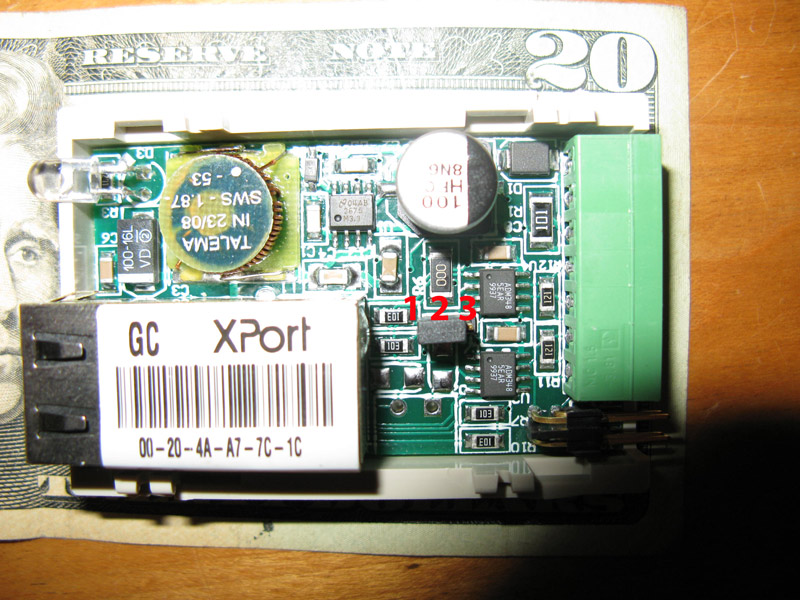
In the picture above, we have an EKM Metering smart kWh meter that uses 2-wire RS-485 communications. The A terminal is connected to the TXDA terminal of the adapter, and the B terminal is connected to the RXDB terminal. The G on the meter is the signal ground and it is connected to SGND on the adapter. The length of the communication wires is extremely short so the termination jumpers have been removed. These are labeled RX TERM and TX TERM. The power supply is a 12VDC brick from an LCD monitor that died. I cut off the terminal and soldered the leads to make them stiff.
Once you connect the NET485 to your network, it will attempt to use DHCP to automatically get a network address. You can then do a port scan to find it using something like angryip scanner, or use the device installer utility from lantronix to find it. The output from device installer will look something like this:
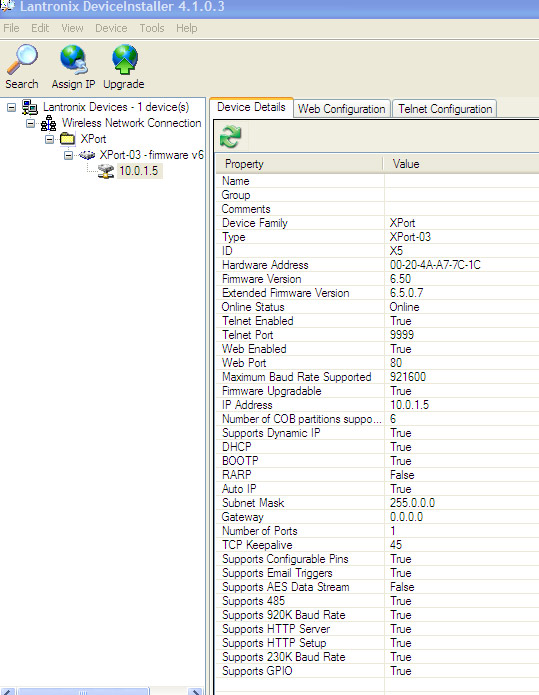
In the image above, you can see 10.0.1.5 towards the upper left, which is the IP address the router assigned to the NET485. The router is an Apple Airport Extreme so it likes the 10.0.1 network - if you have linksys or dlink equipment, you will likely start with 192.168. Also, you will want to use your router's configuration utility to assign a permanent IP address to the MAC address so that it always leases the same address from DHCP -- otherwise you will have to reconfigure serial ports from time to time.
You can use the tabs to choose a web or telnet interface for configuration, however, I prefer just to type in the IP address (10.0.1.5 in this case) into firefox to get this:
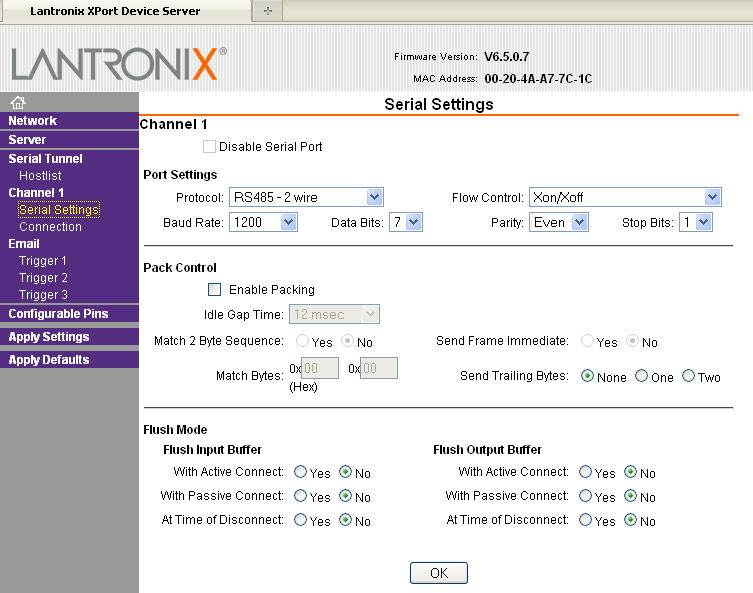
The serial settings here, 1200/7/E were chosen for the software application that comes with the meter which uses these settings by default. The RS485 - 2 wire protocol is the default for the NET485. If you want to use 4-wire or need 4-wire for the loopback test, you have to open up the case of the NET485 with a screw driver and move a jumper (image later).
Here is the 2nd page of importance:
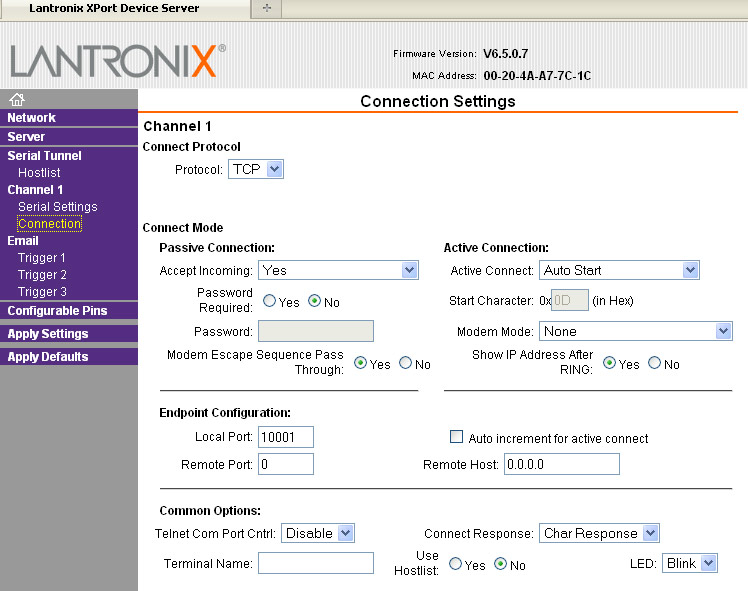
Port 10001 is the TCP port used to communicate with the device. You can connect to this port via any telnet terminal, like puTTY.

Finally, above, we have configrable pin 0 set to RS485 TxEnable, active level High.
In each of these pages you need to press the OK button and then the Apply Settings button. Also, if the settings have not changed when the device reboots, it is probably your browser cache.
Next is a picture of the inside of the NET485 showing the jumper position (there is only one jumper inside) and I have arbitrarily labeled the pins. For 2-wire mode, the default as purchased, you want pins 1 and 2 jumpered. For 4-wire mode, or to perform a loop back test as described in the user manual, you need pins 2 and 3 jumpered instead. The EKM meter needs 2-wire RS-485.
Next, you can install the CPR manager and CPR monitor software from Lantronix. These redirect virtual serial ports to the NET485. To set up the serial port, run the manager and select Add/Remove to select a free port:
When you press OK, a new serial port will appear in the list, like this.

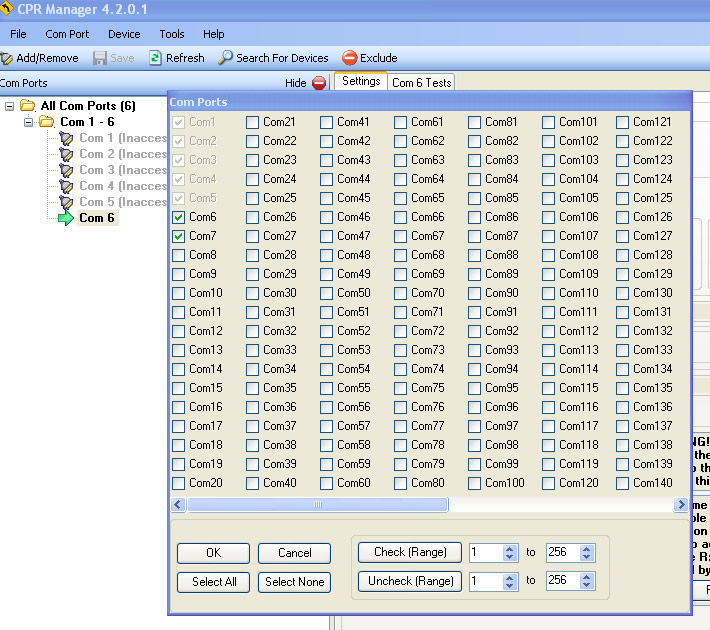
You then have to click on the new port (in red), and set it up. The screen below is the settings for Com 6. It is important to press the search for devices button to find a NET485 so that it shows up in the bottom of the screen. Then, you can double click the device and it will populate into the host list for the com port. Once this is done you can use the Com X Tests tab to ensure the port can be opened and closed.

At this point, you have two ways to communicate with the RS485 network. One is to use Com6 as if it was a RS-232 serial port, the other is to directly connect to tcp port 10001. Let's look at both methods:
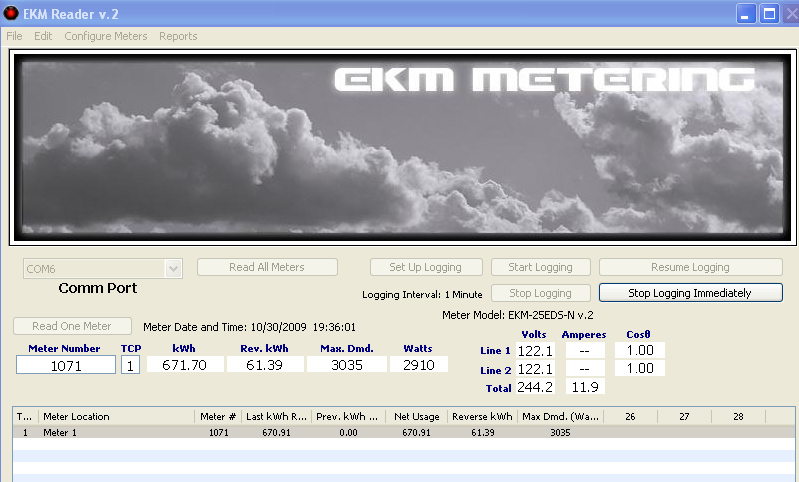
Here is an example using the EKM reader product:
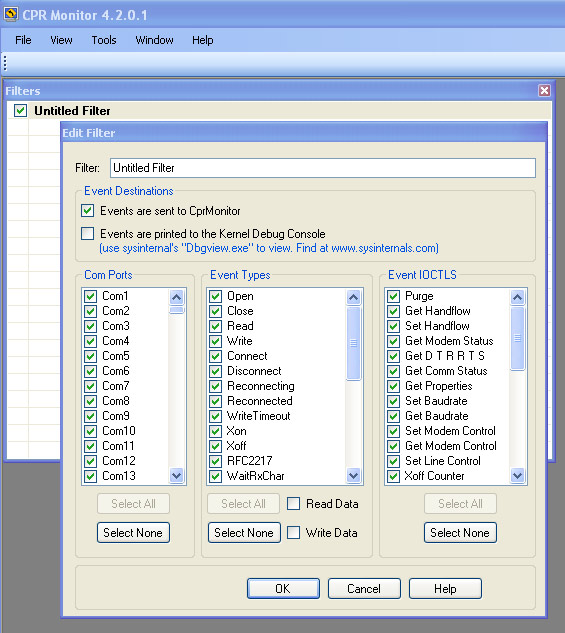
The 'serial' port COM6 is being redirected over the network. You can monitor the activity like this, using the CPR monitor utility. First set up a filter and select all the events.
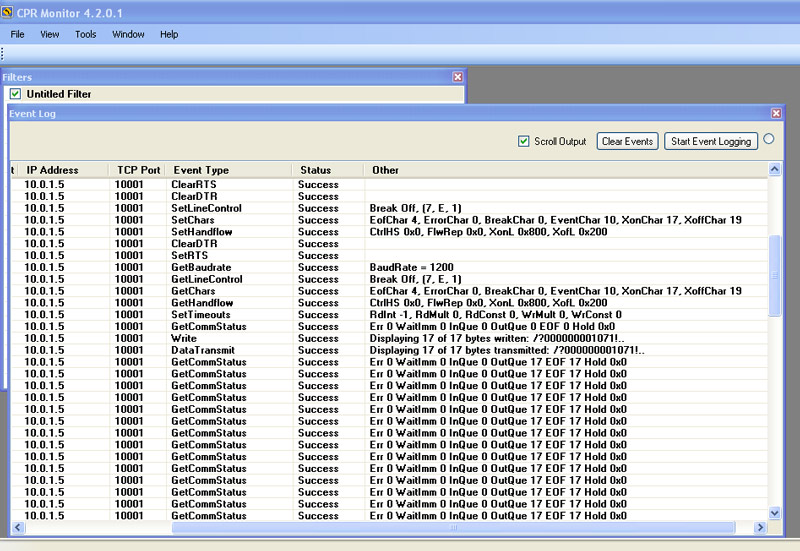
If you start event logging, and then run the EKM Reader, you can see monitor the communication. Notice that the string /?000000001071! was sent to the meter. We can do the same thing in a telnet connection too.
In the screen below, we have used puTTY to connect to 10.0.1.5 port 10001 and entered the string /?000000001071! followed by enter. The number 000000001071 is the meter's serial number. The data that follows is the meter's response. The 67173 in the first line of the response represents 671.73 kWh.

Open issues:
- The Redirector software supplied with the NET485 caused XP Professional and XP Tablet edition with the latest security patches to reboot immediately after startup with a blue screen of death. If this happens to you, restart pressing F8 to get into safe mode, go the control panel, select add/remove programs and uninstall the entry named 'Redirector'. The culprit was ltxred.dll which is the lantronix redirector. This software has been updated with the Com Port Redirector product which is far more sophistated.
- When you are experimenting with communications it is possible to confuse the EKM meters so that they no longer respond to queries. If this happens, you can power off the meters with the circuit breaker that is connected to their L1/L2 terminals for a few seconds.
- The EKM Reader product has not been tested with this interface. If you want to log data from multiple readers via TCP/IP using the EKM reader software then you can order a 485 device from EKM that is guaranteed to work with their software.
Adding a 2nd EKM smart meter
Connecting the 2nd EKM reader only requires daisy chaining A to A, B to B and G to G from the first meter to the 2nd meter. Since these meters have their serial numbers programmed at the factory, you don't have to worry about interference (e.g. they will not all respond simultaneously to a read request). You can ignore the vertical wire attached to pins TXDA and RXDA on the NET485 and the termination jumpers -- these were there for testing a solar collector controller.

Next: Using the NET485 to interface to a RESOL DeltaSol BS+ solar panel controller.
-- end ---